How to use Custom Fields for tasks in Orangescrum
Custom fields let you add additional data to tasks in your projects. You can create a custom field to capture more data for your tasks like URL, task number, any specific data related to tasks, cost, email, or anything else that’s important to your project, workflow, team, and company.
This allows individuals to have clarity on work happening across their projects.
Key Features
- Create your own fields
- Create a field for a specific business context that is available while creating a new project
- Choose a field type
- Enable field usage
- Make your fields available for Task & task detail page by enabling custom field
- Edit fields that have already been Assigned
- Delete fields that have already been Assigned
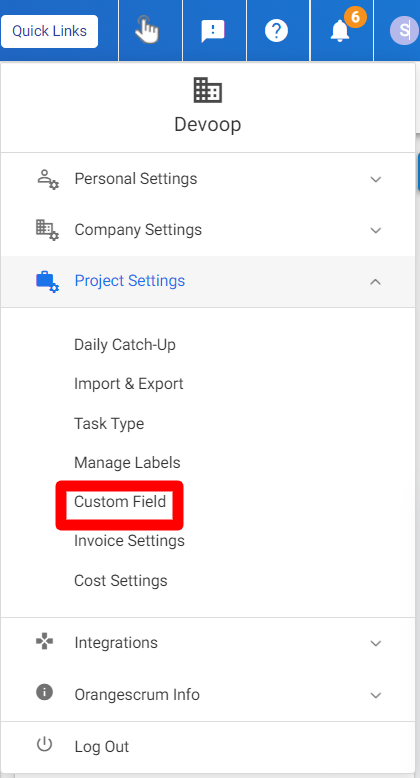
How to find the Custom Fields:
A user can find the options for a custom field by following the steps below.
1: Click on Profile
2: Select Project Settings from the drop-down.
3: Click on the Custom field.
How to Creat a new Custom Field:
To create a new custom field, follow the steps below.
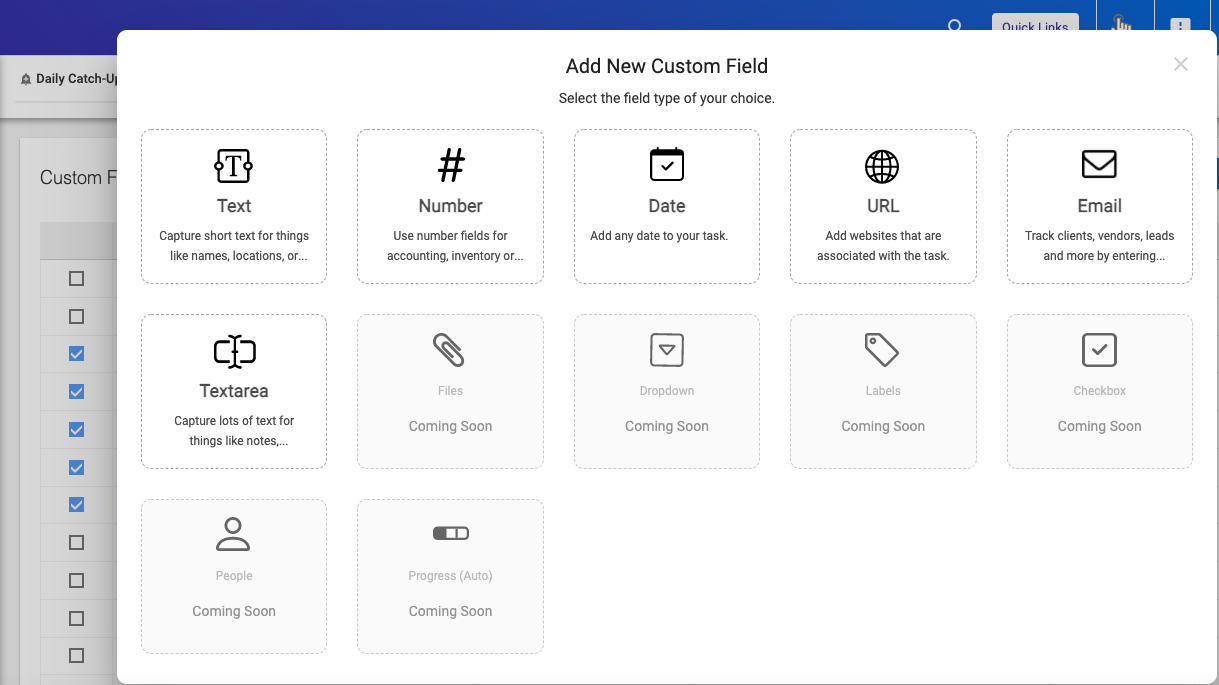
1: Select “New Custom Field”
2: Select the Custom “Field Type” (Refer Image 2)
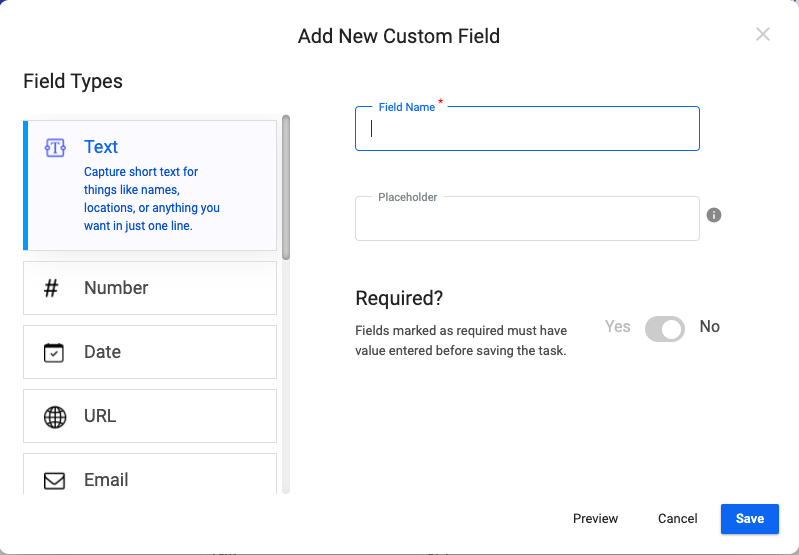
3: Specify a field name and place holder (Refer Image 3)
4: Mark if the field is a required field or not. (Refer Image 3)
5: Click on “Save” (Refer Image 3)
(Image 2)
(Image 3)
What are the Field Types available:
Single line text: Add single-line text to capture names, location, etc in one line
Date: Add a date using this field in the task
Number: Add numerical numbers using this field in the task
URL: Add email addresses using this field in the task
Email: Add Web: Addresses using this field in the task
Multiline Text: Add multiple lines texts to capture names, location, etc in one line
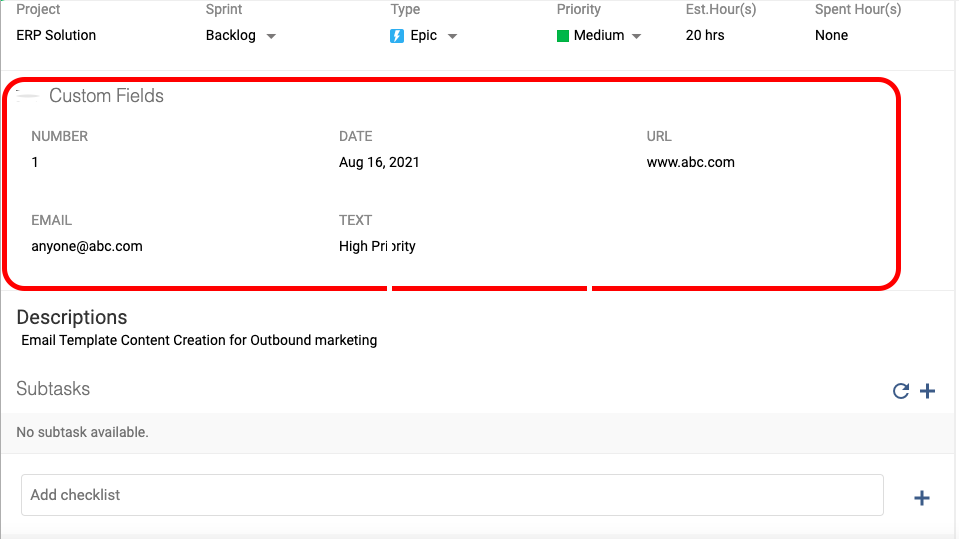
Now when the users will create any new task, these custom fields will be listed on the create task popup.


User note:
- Users can also edit the custom field values of a task by clicking edit task from the task list page.
- On clicking the task edit icon one can edit custom field values. And the edited values of custom fields can be seen on the detail page.
- Duplicate custom fields – Don’t create duplicate custom fields with the same name as other custom fields. The unique custom fields will bring more clarity to your tasks.
- Relevant Custom Fields– Add relevant custom field details – Always try to add relevant data to the custom fields. Ex- If there is a custom field for adding an email address, then users must add the email address in that field rather than adding something else.
- Make it Generic – Make custom fields names generic – At the time of creating custom fields, the names must be generic as they should be understandable to all other users. For example, instead of naming a field “Mail”, name the field “Email Address” and provide the placeholder name as “enter an email address”. This brings more clarity to other users.
How to Edit a Custom Field:
Users can edit existing fields by following the steps below.
1: Go to the “Custom Fields” page
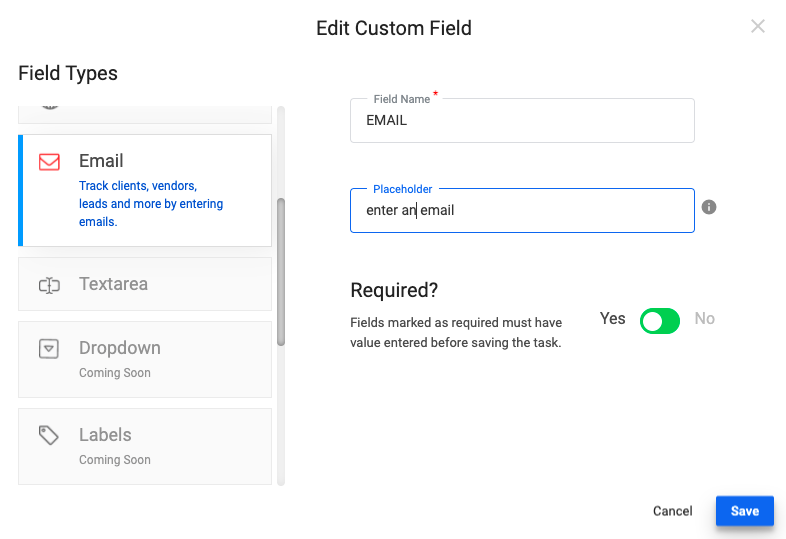
2: Find the “Edit option” against the custom field you want to edit. (Refer to Image 5)
3: Make the necessary changes in the “Field name” and “Placeholder” (Refer to Image 6)
4: Click on “Save”

(Image 5)
(Image 6)
Where to use Custom Fields?
You can use Custom Fields to capture a task’s custom property values. Custom Fields created against any project are added automatically while creating a new task.
Users can also edit the custom field values of a task by clicking edit task from the task list page.
On clicking the task edit icon one can edit custom field values. And the edited values of custom fields can be seen on the detail page.
User note:
- Users can also edit the custom field values of a task by clicking edit task from the task list page.
- On clicking the task edit icon one can edit custom field values. And the edited values of custom fields can be seen on the detail page.
What is Advanced Custom Fields?
These are the advanced fields, which have pre-defined logic. Here the only users need to select and add those fields in tasks.
Actual task completion date – It will show the actual completion date of the tasks when it is marked as complete or closed the task
Duration of the task – It will show how many days/hours are needed to complete the task.
Variation – Actual days it took to complete the task
These are the advanced fields, which have pre-defined logic. Here the only users need to select and add those fields in tasks.
How to add an advanced Custom Field:
Users can edit existing fields by following the steps below.
1: Go to the “Custom Fields” page
2: Find the “Advanced Custom Fields”
3: Select the custom fields to be added
Why Custom Fields?
Visual Organization: A custom field creates a visual impact across your projects with multiple colors, numbering, and a key so that it’s easy to keep track of where things stand.
Custom fields make it easy for your team to track their work and prioritize it based on the information they’re needing to manage.
A custom field creates a visual impact across your projects with multiple colors, numbers, and a key so that it’s easy to keep track of where things stand.
Ease of Addition: Adding fields to your projects can be an easy task for teams with the time, workflow, and deadlines to remember. Custom fields make it easy for your team to track their work and prioritize it based on the information they’re needing to manage.
How do Custom Fields work?
- After a custom field has been used to gather information from multiple projects, it is exported into one place. That one place is most often your Client Manager or your Production manager’s interface.
- The other Project Managers will then be able to view the detailed Field Information for that project as it existed at the time of the submission. What does this mean for you as a Project Manager?
- Whenever you submit custom fields, your clients will be able to see the amount of information that was given in the custom fields.
- When it comes time to resubmit a Field Request, the client will be able to see the original Field Request, along with any modifications that have been made in response to feedback or available information at the time. How does this help you as a Project Manager?
The Benefits of having Custom Fields in Project Management Tool
An individual can make a mark in the world: you can add timestamps to a task or create a task title that helps find the tasks that need your attention faster.
- Simplify projects: make it easier for users to access information
- Analyze project data: gain insights into current project status Manage teams efficiently: allow your team members to review projects and track changes
- Streamline workflows: Shorten project timelines have the ability to add and modify fields that reflect your organization
Availability :
The Custom fields feature is available in the Professional Plan starting from the 11 Users.
