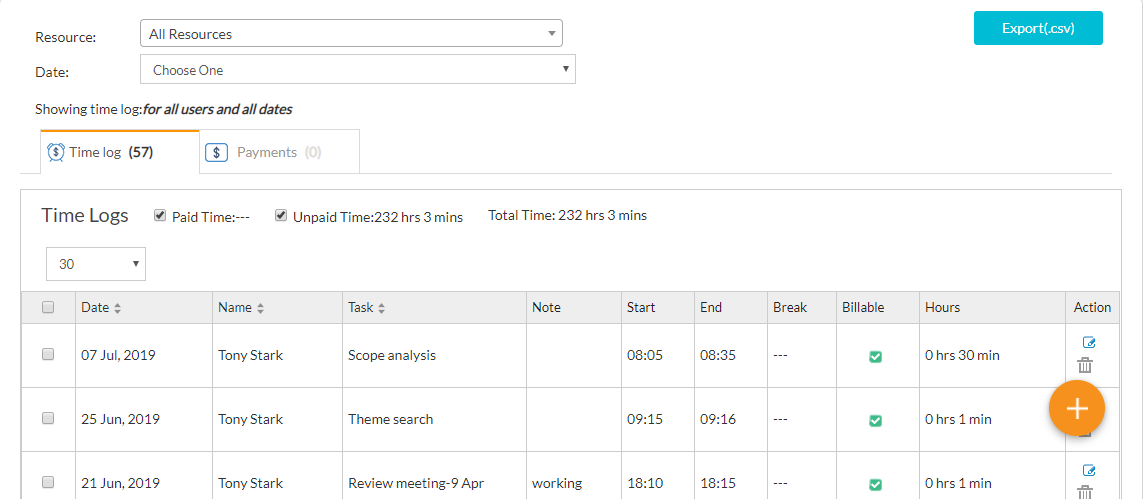
With Orangescrum’s Time Log feature, you can log time for your task at any time. The Time Log list view will show the time logs of your tasks. Owner and Admin can see the spent hours of other resources as well.
There are 3 ways you can log time for a task:
- Log Time
- Start Timer
- Timesheet
Using Log Time:-
- Navigate to Add-on >Time log from the left panel.
- Executive dashboard users can navigate to Feature>Time log> View Time Log.
- Hover on
 Button on the right-hand side; click on the Log Time button
  .
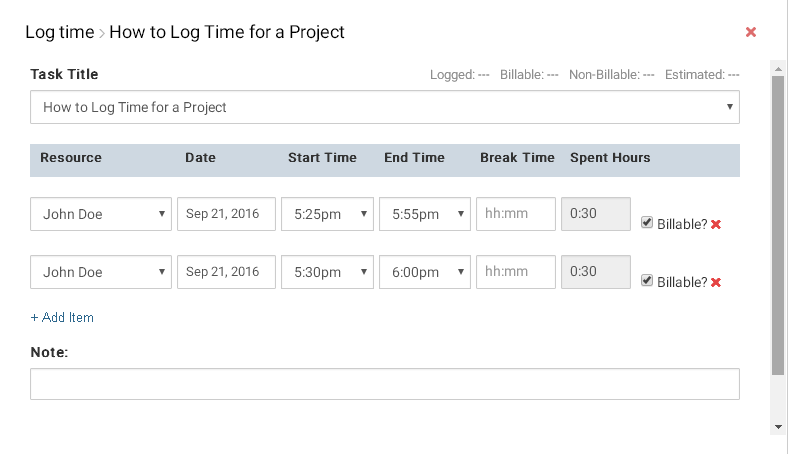
. - On the Log Time pop-up, enter the following details: Task, Resource Name, Date, Start Time,End Time & Break Time.
- Once Start Time, End Time & Break Time are added, Orangescrum will automatically calculate the Spent Hours for you.
- By default “Billable” field is checked, you can uncheck in case time log is done for non-billable hours.
- Click on “+ Add Line Item“, if you want to log more hours for a different resource or same resource different date or different time.
- Enter the Note (if any) & click on “Save” button to save data.

On the Time Log page, you can view the time log for:
- Resources
- Task
- Date
- Spent Hours
- Billable or Non-billable
- Notes
Along with the above information, you can see the Total Logged Time, Total Billable hours, Non-Billable hours, Estimated Hours for all users and all dates. You can click on Export(.CSV) to export the data in form of CSV.

Using Start Timer
- Navigate to Add-on >Time log from the left panel.
- Executive dashboard users can navigate to Feature>Time log> View Time Log.
- Hover on the
 icon and click on
  to start the Timer.
 - Or, Go to +New button on the top menu bar and click on the Start Timer button.
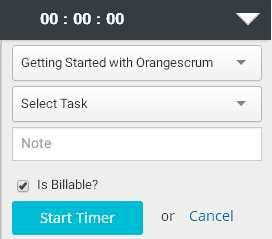
- Once you clicked on the Start Timer, the Timer sheet will open.
- On Timer, select the Project and Task.
- Enter Note (if any) & mark billable or Non-billable (by default billable field is checked)
- Click on the Start Timer button to start the Timer top track your time.
- You can pause, start or cancel the Timer at any time before saving the tracking time.
- Click on the Save button to save the time for the selected task.

Using Timesheet
You can log time using the Timesheet by the following ways:
- Weekly Timesheet
- Daily Timesheet
Weekly Timesheet
- Navigate to Add-on >Time log> Weekly Timesheet from the left panel.
- Executive dashboard users can navigate to Feature>Time log> Weekly Timesheet
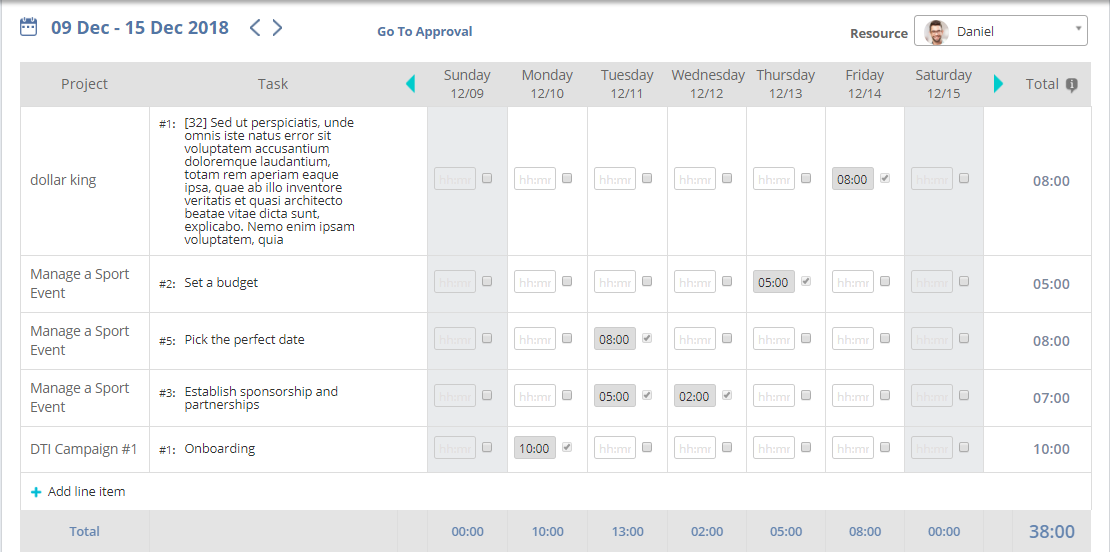
- By default, you’ll be on the current week starting from Sunday to Saturday & Tasks which you have closed/performed any action (ex. Task modified, updated, added time log, changed assign to, changed due date etc.) will be added to your timesheet.
- Navigate to your tasks and log your spent hours under a particular date/day in HH:MM format.
- To add a new time entry for a task which is not showing in the timesheet, navigate & Click on + Add line item (at bottom of projects column)
- On the Pop-up, select Project and Task, enter time log for each task added to the timesheet.

Daily Timesheet
- Navigate to Add-on >Time log> Daily Timesheet from the left panel.
- Executive dashboard users can navigate to Feature>Time log>Daily Timesheet.
- To log time, click on + Add line item to select a Project and Tasks to log time.
- After selecting the Project and Task, entry time under the Hours column with format HH:MM
- Add a Note (optional) to time entries and mark your log time as billable or non-billable as well
- Click on “Save” to successfully log time for task.

Note:- Timesheet feature is only available with Time Log Gold add-on.


 (
( (
(