How to Create a New Role Group & Role?
- Log in to your Orangescrum account.
- Navigate to Profile Icon>Company Setting>User Role Management
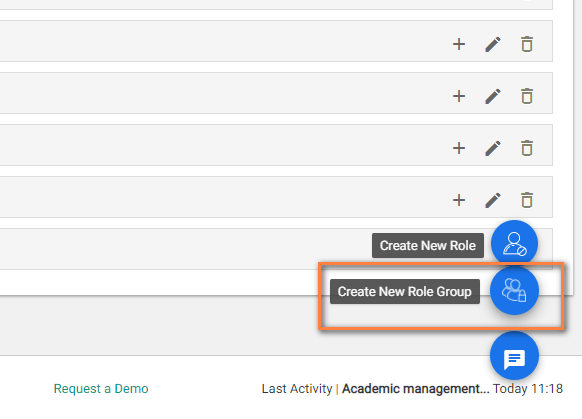
- On the User Role Setting page, hover on the “+” button & Click on the option to “Create New Role Group”. (Refer Image -1)
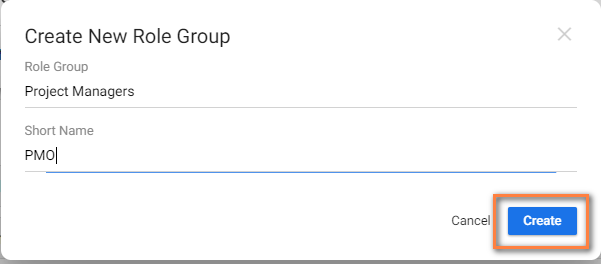
- On the Role group pop-up, you can mention your role groups like: Accounts & Finance, Human Resource, Project leads etc. and the short name for Department.(Refer Image-2)
- Click on ‘Create’ to create Role Group.
Once you have created custom role group, you can add custom roles under it and assign role privileges.


(Image -1) (Image-2)
With a custom role, you can define or control what a user can do within your project or in Orangescrum. The custom user access role is associated to a role group. Every user role has View, Manage & Delete permission for different features/modules such as Task, Project, Timelog, Gantt chart etc.
Important Note:
- A Custom User Role or Role Group can be created by admins and owner of the account.
- Owner and Admins can create unlimited number of user roles. There is no restriction on number of user roles or role groups in Orangescrum.
- You can’t change or modify default user roles & their permissions, i.e Owner, Admin, Client & User.
- Orangescrum allows only one owner per account
- This feature is available to all accounts.
To create a custom user role,
- Navigate to Profile Icon>Company Setting>User Role Management
Tip: You can also access User Role Management from Quick Links under Company Settings
- On the User Role Setting page, hover on the + icon
- Click on the Create New Role button
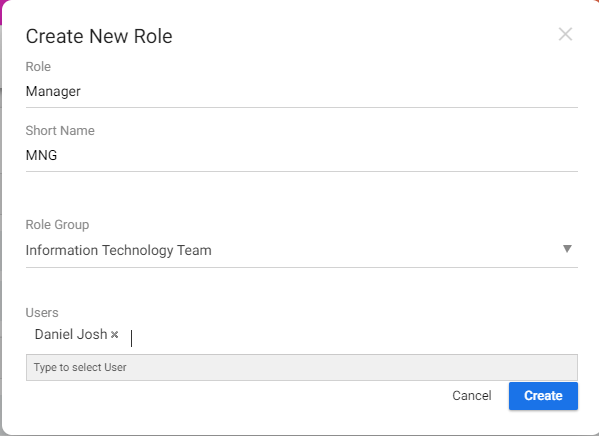
- On the Create New Role Page pop-up, define which “Role” you want to assign to a user like: Developer, Tester, Analyst, Graphic Designer, and Project Manager Etc.
- Short Name: Provide a short name for the User Role
- Role Group: Select the Role Group under which this role will be associated
- Users: Add user(s) for the new Role

Note: If you add a user to any custom role, then the user will remove from the previous role. The new role will be assigned to the user.
- Click on Create to successfully create the new User Role in Orangescrum.
Orangescrum Tip: This role created on the account level and applicable for all projects. To create project specific role, navigate to your project page and follow these steps.
Define User Access Control or Permission of User Roles
To define the actions or permission of users what they can do within your project or tool, you must create user role groups and then user roles under the role group. Once you create the user roles, added users, you need to define the access and permissions for each role.
- Navigate to User Role Management Setting from Quick Links under Company Settings
- On the User Role Setting Page, Click on the Custom User Role
- Under the role, you can see different modules/features such as Task, TimeLog, File, Invoice, Gantt Chart etc.
- Click on any module, it will show the complete list of actions of each module in terms of “View, Manage, Delete”
- Check the corresponding box to provide access to that particular role and uncheck to remove the access/permission of that action for the role
- Click on “Save Changes”
Orangescrum Tip:
Private Task: For example, click on Task Module. Under View, Check All Tasks that means the users belong to this user role can view all the task of the assigned projects. However if you uncheck it, then the users can view only the task assigned to them.
Only allow Timer for time entry: Click on Timelog module, uncheck the “Manual Time Entry” option under the Manage section. That will remove the Manual Time Entry, Weekly Timesheet and Daily Timesheet option from the user’s account. The user can log time only through the timer.
Don’t Allow to edit time log: Click on Timelog module, uncheck the “Edit Timelog Entry” option under Manage. This disables users of a role to edit any time log entries.
Edit Custom User Role
- Navigate to Quick Links and click on “User Role Management” under Company Settings
- Go to the User Role, and Click on the Edit icon
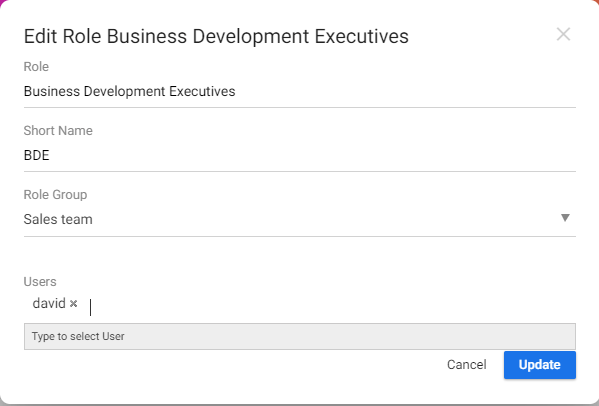
- On the Edit pop-up, you can update Role Name, Short Name, Change Role Group, Add or remove Users from the User Role
- Click on the Update Button

Note: Only account admins and owner can edit user roles.
Delete Custom User Role:
- Navigate to Quick Links and click on “User Role Management” under Company Settings
- Go to the User Role, and Click on the Delete icon

Note: Once you delete a user role, the assigned user belongs to that user role will be removed from the role, and added to the default user role.
Add Users to User Role
- Navigate to Quick Links and click on “User Role Management” under Company Settings
- Go to the User Role, and Click on the User icon
- On the pop-up click on +Add Users button
- Type the user name, select the user and click on “Add User” button
Tip 1: On the Edit User Role pop-up, you can add or remove users from the User Role as well.
Tip 2: While inviting a new user through Quick Links>>User>> you can select the User Role of the newly invited user